The DOM
In this tutorial we are going to look at p5js’s functions to access and manipulate the DOM and use them to create a simple audio player interface.
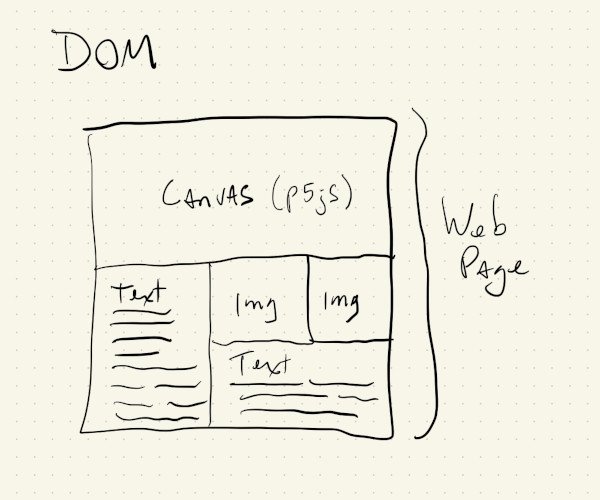
First, The DOM (Document Object Model) is just the official way of referring to the collection of HTML elements that make up a webpage. These are the <p>, <img> and <a> elements for holding text, images and links, and also some more complex elements, like <canvas> elements, where our p5js sketch gets drawn or <video> and <audio> elements for displaying different kinds of media on a webpage.
Usually, these elements and their content are defined in the html file for the webpage, and any special behavior is specified using a separate JavaScript file. We might have a button defined in our html file and then a JavaScript file would specify what happens when that button is clicked.
Somewhere in the html we could have something like this:
<button onclick="displayTime()">Display Time</button>
And then in a JavaScript file:
function displayTime() {
  let time = new Date();
  alert(time);
}
In this example, the displayTime() function uses the JavaScript alert() function to show a popup with the current time and date. Don’t worry about the details; it’s just a simple example of html with JavaScript to show that, traditionally, html defines the what of our webpages and then JavaScript defines the how.
Elements in a webpage that are static, or, don’t have to move around or change, will be defined in the html. Elements that are created based on user interaction can be created in the JavaScript file and added to the webpage’s DOM dynamically.
Nowadays it’s become more common to use frameworks like Angular, React, Vue or Svelte to create webpages with elements that have more complex behaviors, like submitting forms, accessing databases, validating passwords, etc.
And even though p5js is not the best tool to create these kinds of websites and interactions, it provides us with a bunch of functions to create and manipulate html elements on the page.
One important thing to note is that, the code for our sketch gets drawn in a <canvas> element that is part of our html page. All of the elements that we add with the p5js DOM functions will get added to our html page, and NOT our canvas. They’re two separate, but connected worlds. And even though we can make DOM elements show up on top of our canvas, they’re not in our canvas.
Keep that in mind as we go through these examples and start using DOM elements in our sketches.
We can add links to our sketch:
And then we can use our p5js draw() and mouseClick() to dynamically calculate the position for a link, or to dynamically keep adding links as we click:
This is fine and fun, but unless there’s a real good reason for creating these kinds of static elements dynamically in our p5js, it’s best to have them defined and positioned in the html file.
But, the p5js functions for adding elements to the DOM become really useful in situations where we want to create some simple user input elements:
In this sketch, the createSlider() function creates a html <input> element of type range, and returns an object that we can use to change its position and style. Then, in draw() we use the object’s value() function to access its current value and use it to change background and text colors.
We cna also create html <button> elements in a similar way, and, kind of like with the mouseClicked() function, we can define functions that will execute whenever the button is pressed:
We can combine our button with the sliders in a way that every time the button is clicked, the sliders get updated with the new RGB values for the background:
The more correct way of doing this in 2023 is using an <input> element of type color that creates a browser-specific color picker element with a lot of options:
In the next tutorial we will use some html elements to create a simple sound player.