Events + Classes = Buttons
In this tutorial we are going to continue looking at classes and how they can help us write better organized code by keeping related data, logic and processes together and away from our main setup() and draw() functions. This way changing or updating our objects is easier because we know exactly where their code is and what else they interact with.
Let’s start with a simple example of a toggle button that uses different colors to show in which of its \(4\) possible states it’s in: The button can be on or off, and both of these states also have to signal whenever the mouse is on top of the button. So, it’s a toggle button with a hover effect:
We also added a label to the button that shows what state it’s in.
This code that was used to set a variable with the correct label for the current state:
let bText;
if(STATE == 1) {
  bText = "ON";
} else {
  bText = "OFF";
}
could’ve been done like this:
let bText = ["OFF", "ON"][STATE];
We’re creating an anonymous array (it has no name) and indexing it right away to get one of its values. If STATE is \(0\) we get the first string ("OFF"), and if STATE is \(1\) we index the second item ("ON"). Sneaky, but a lot shorter to write.
There’s also something called a ternary operator in JavaScript:
let bText = (STATE == 0) ? "OFF" : "ON";
It’s basically a very quick way of writing an if/else statement when we want to use boolean operations to select one of two values. It’s like the question mark (?) is asking “is this true?”, and if so, pick the first option. If it’s false, the colon (:) reads like an “else”.
Anyway.
Let’s now add some other buttons. In order to facilitate this, we’ll move some of the global state variables, like STATE and HOVER to be inside our JavaScript object. We’ll also move the color array inside the object, and push our objects onto an array:
mButtons.push({
  x: random(0, width - 100),
  y: random(0, height - 50),
  w: random(50, 100),
  h: 50,
  state: 0,
  hover: 0,
  colors: toggleColors,
});
Our mouse event functions have to check all of the buttons for hover and presses now, but the logic for a single button, inside our isOnTop() function is the same:
This works, but we have button data and functions everywhere in our code: initial values for button parameters are in setup(), the logic for picking colors and label text is in draw(), and logic for checking mouse events is in functions at the bottom of our file.
We can use a class to organize this better. That way, all data and all behavior and update logic will live inside a self-contained definition that is easier to read and update.
Let’s move the initialization and draw logic to the constructor() and draw() functions, and the mouse event functions to their own checkHover() and checkClick() functions:
Since our object is a toggle button, with \(2\) states, there are lots of places where parameters are updated based on a binary choice. It makes sense to do these using the ternary operator.
So, something like this, that checks and updates the toggle state based on the return value of isUnderMouse() every time there’s a click:
let mHover = this.isUnderMouse();
this.state = mHover ? 1 - this.state : this.state;
can be read like: “is this under the mouse?”, if so, toggle the state variable, if not, keep it as is.
And the toggle logic is based on the fact that our button only has two states, 0 and 1. When the current state is 0, (1 - state) will evaluate to 1, and when state is 1,(1 - state) will give us a 0.
Oh, and since we have a constructor that can take an array of colors as an argument, we can easily create Buttons with custom colors in our setup(). We just have to pass an array with two colors after the x and y parameters:
let specialColors = [color("mediumpurple"), color("gold")];
mButtons.push(new Button(30, 220, specialColors));
Our constructor is declared like this:
constructor(_x, _y, _colorArray = null) {
  ...
  if (_colorArray) {
    // create a copy
    this.colors = _colorArray.slice();
  } else {
    // some default colors
    this.colors = [color(230, 0, 30), color(30, 230, 0)];
  }
}
The _colorArray = null part of the constructor definition means that the constructor expects 3 arguments, but if only 2 arguments are given, it will use null as the third argument. Further down in the constructor we use if (_colorArray) to check if an array was given to the constructor, and if not, we use a default one.
Ok. This is good. Now we have the button logic separated into a class and we can start to think about other things we’d like our class to do.
Maybe we want to reset all of our buttons with a specific keyboard command:
We’ll add a reset() function to our class:
reset() {
  this.state = 0;
}
And then, when we detect the ‘r’ or ‘R’ keys inside mousePressed(), we reset all the buttons to their off state:
if (key == "r" || key == "R") {
  for (let bi = 0; bi < mButtons.length; bi++) {
    mButtons[bi].reset();
  }
}
Now that the code is organized into a class, and each button is responsible for its own state and updates, we can add logic to reset the state of a button after it has been on for 10 seconds.
We start by adding this to the checkClick() function:
if (mHover && this.state == 1) {
  this.resetAt = millis() + 10 * 1000;
}
We know there was a click, so if this button was under the mouse (mHover is true), and the new state is 1, then we set a variable to hold the time in milliseconds of when this button should reset. We are giving it millis() + 10 * 1000 because that is \(10\) seconds from now.
And then in draw() we check if the button should reset or not:
if(millis() > this.resetAt) {
  this.reset();
}
Since this logic isn’t about drawing we really should put it in an update() function, in order to keep a clear separation of responsibilities between our functions. But since we don’t have too many things to update, it’s ok to keep this in draw() for now:
And, now let’s make some Buttons that don’t want to be turned off.
We’ll add an update() function because now we’ll have other things to keep track of and update.
The logic that we need to add to our class includes:
When a button turns on, we want to move it away from the mouse. So, in checkClick(), if the button was just clicked, we give vx and vy some random values from a list:
this.vx = random([-5, -4, 4, 5]);
this.vy = random([-5, -4, 4, 5]);
When we check for hover, if the mouse is within a few pixels of the button, we give it a velocity that is proportional to the distance from the mouse to the center of the button. So in checkHover() we add:
if (this.state == 1 && isNear) {
  // velocities based on distance from mouse
  this.vx = (this.x + this.w / 2 - mouseX) / 3;
  this.vy = (this.y + this.h / 2 - mouseY) / 5;
}
The isNear variable is calculated using a new function called isNearMouse(), which takes a margin parameter that specifies the maximum distance that we’ll consider to be close. So this function returns true whenever the mouse is within margin pixels away from the button.
In reality this function is just like our isUnderMouse() function from before, but instead of checking the button’s actual boundaries, we imagine we expand our button by margin pixels in each direction, and then we check if the mouse is under this expanded button.
So this:
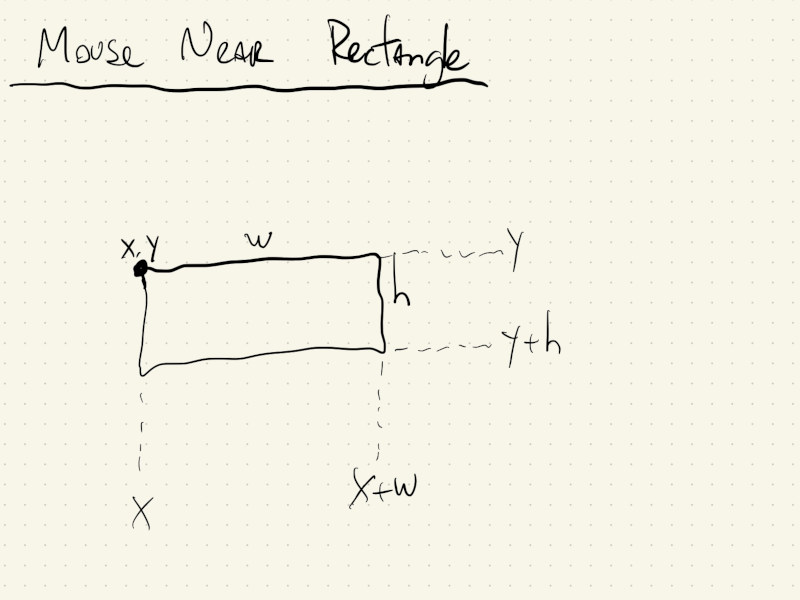
isUnderMouse() {
  return (
    mouseX > this.x &&
    mouseX < this.x + this.w &&
    mouseY > this.y &&
    mouseY < this.y + this.h
  );
}
becomes this:
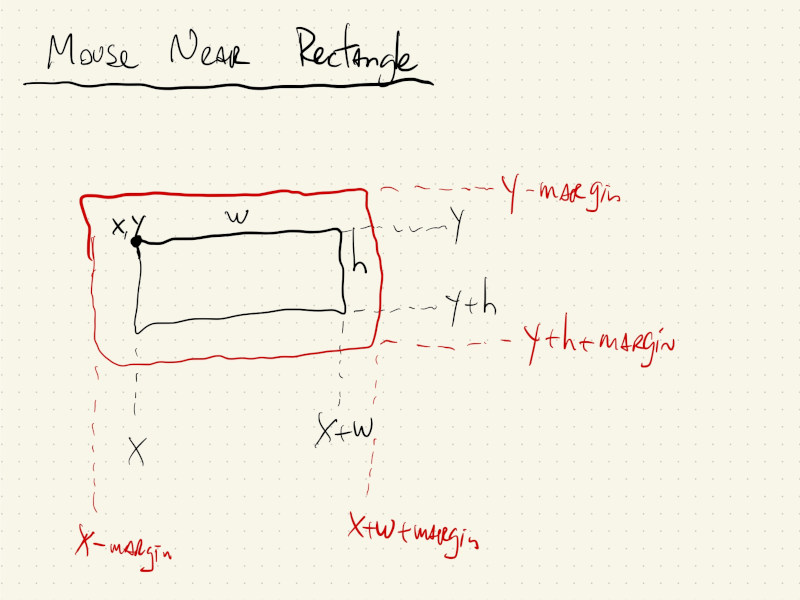
isNearMouse(margin) {
  return (
    mouseX > this.x - margin &&
    mouseX < this.x + this.w + margin &&
    mouseY > this.y - margin &&
    mouseY < this.y + this.h + margin
  );
}
In update() we check the timer logic, and, if the button is on, we also update the its position and velocity:
if (this.state == 1) {
  this.x += this.vx;
  this.y += this.vy;
  this.vx *= 0.9;
  this.vy *= 0.9;
}
Multiplying the velocities by \(0.9\) just makes them decrease geometrically over time.
The last thing to add is in reset(). Because our buttons move now, whenever we reset them back to their off state we also check if they have moved off screen. If so, we just give them new, random, \(x\) and \(y\) positions:
if (this.x > width || this.x < -this.w) {
  // move it to random location within screen
  this.x = random(width - this.w);
}

// same for y
if (this.y > height || this.y < -this.h) {
  this.y = random(height - this.h);
}
Our rebellious button sketch will then look like this:
All of our complex logic is in the Button class, and our setup(), draw() and mouse event functions just call the appropriate methods for each of our Button elements, and everything works.